This workflow will show you how to edit, extend, and extrude patches in Leica’s Cyclone.
Hint: You can click on any image to see a larger version.
Modeling – Editing, Extending, and Extruding Patches:
[wptabs style=”wpui-alma” mode=”vertical”] [wptabtitle] MAKE RECTANGULAR[/wptabtitle]
[wptabcontent]Make Rectangular: When patches are created, they have multiple edges and vertices. It is a good rule of thumb, to make all patches rectangular before editing them. To make patches rectangular, Multi-select all patches –> Edit Object –> Patch –> Make Rectangular
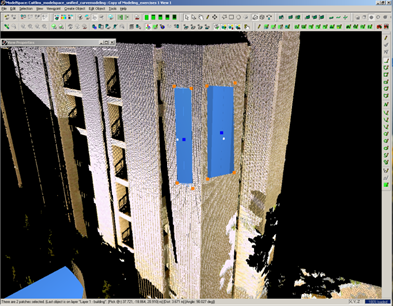 Figure 7: Patches that have been made rectangular
-
Note: When made rectangular, patches will sometimes extend beyond the surface being modeled; use the handles to drag the corners/edges so that they are completely within the area of the surface being modeled
 Figure 8 (Left) Surface to apply patch to is highlighted in yellow; (Center) Patch created and made rectangular – note the corners extend beyond the surface being modeled; (Right) Using the handles, the patch has been dragged so that it is completely within the surface being modeled
[/wptabcontent]
[wptabtitle] EXTENDING PATCHES[/wptabtitle]
[wptabcontent]Extending Patches:
Extending patches extends the boundary of the selected patches to intersect together. There are several options to do this.
Note: The order in which the patches are extended and the number of patches being extended in a single command affects the calculations that Cyclone makes. Adjusting the order and number of patches involved may create different results depending on the complexity of the geometry.To extend all patches to one another –> Multi-select the patches to extend –> Edit Object –> Extend All Objects.
To extend patches to a single patch –> Multi-select (1) patches to extend (2) the patch which the others are to extend to –> Edit Object –> Extend to Last Selection (Note, you may also extend to a reference plane with this command or Select Object -> RC -> Extend to Reference Plane)
Next: Continue extending the objects to their perimeters (ie wall boundaries) and using handles to snap adjacent objects/patches together
[/wptabcontent][wptabtitle] SLICING PATCHES[/wptabtitle]
[wptabcontent]Slicing Patches:
As objects/patches are extended, they may extend beyond the plane or object specified. Patches may be sliced by adjacent patches to clean up corners
Multi-Select Patches to Slice -> Create Object -> Slice -> By All in Selection (every patch selected is sliced where it intersects with every other patch) / By Last Selection (Every patch selected is sliced where it intersects with the last object selected) / By Reference Plane (Every patch selected is sliced by specified Reference Plane) Figure 9: (Left) Extended patch has extended beyond the referenced object (single patch makes up area inside yellow triangle) (Right) Patch has been sliced so that it is now divided into two patches where it intersects the reference object (sub-divided patch now highlighted with yellow triangle
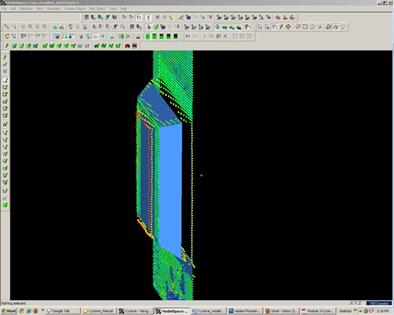 Figure 10: Sub-divided patches can now be deleted, leaving clean corners where patches intersect
[/wptabcontent]
[wptabtitle] EXTRUDING PATCHES[/wptabtitle]
[wptabcontent]Extruding Patches:
Create the patch –> multi select 1) the patch and 2) a point on the point cloud or another object that you would like to extrude the patch to.
 Figure 11 (Left) Creating a rectangular patch then multi-selecting the patch (1) and a point on the wall (2) to extrude it to (Right) The resulting extrusion
[/wptabcontent]
[wptabtitle] CONTINUE TO… [/wptabtitle]
[wptabcontent] Continue to Leica Cyclone 7.0: Modeling Non-Rectangular Patches.
[/wptabs]