[wptabs mode=”vertical”]
[wptabtitle] Using Eclipse IDE[/wptabtitle] [wptabcontent]Since there is a plethora of existing tutorials guiding how to set up various development environments in C++, I will show you how to set up the 32-bit OpenNI JAR (OpenNI Java wrapper) in Eclipse IDE and to initialize a production node to begin accessing Kinect data via the Java programming language.
To continue we will be working with the open-source and fantastic piece of software known as Eclipse that you can find here: www.eclipse.org. You will want to download the IDE for Java programmers located on their “downloads” page(about 149 mb). Take note of the many other software solutions that they offer and the vast amount of resources on the site.
NOTE: Even though we are downloading the “Java” Eclipse IDE you can easily add plugins to use this same piece of software with Python, C/C++, and many other applications.
Additionally, we are assuming that you have already gone through the OpenNI installation located here.
You also need to have the Java JDK installed (www.oracle.com).
Finally, to gain access to one of the best open-source computer vision libraries available, you will need to download and install OpenCV(http://opencv.org/) and the JavaCV(http://code.google.com/p/javacv/). The installation instructions located on each of these sites are excellent.
[/wptabcontent]
[wptabtitle] Setting Up Eclipse with OpenNI: Before You Start[/wptabtitle] [wptabcontent]
Important Note: As you may already be aware, these tutorials are focused on the Beginner Level user, not only to using the Kinect but also to programming. Before going any further I should also remind you that if jumping “head first” into the new domain of programming isn’t something for which you have the interest or the time, there are many things you can accomplish with the “ready to use software” solutions located here.
Also, before starting, make sure that you are using the same platform (32 –bit to 32-bit/64 to 64) on the Eclipse IDE, Java JDK, and OpenNI installation.
[/wptabcontent]
[wptabtitle] Eclipse with OpenNI: Starting a New Java Project [/wptabtitle] [wptabcontent]
Starting a New Java Project …..
Once you have downloaded Eclipse, installed the java JDK and the OpenNI/Primesense, you will need to start a new Java Project. Following the wizard is the easiest way to do this.
Check the box that says “public static void main(String[] args)” so that Eclipse will add a few lines of code for us.
NOTE: For this tutorial I have kept the names fairly vague – be sure to use names that you will remember and understand. Remember that if you use a different naming convention than shown here, you will need to make corrections in the sample code to fit to your specifications.
[/wptabcontent]
[wptabtitle] Eclipse with OpenNI: Adding the OpenNI Libraries Part 1[/wptabtitle] [wptabcontent]Adding the OpenNI libraries…
Next we will need to add the OpenNI libraries to the project. This is a pretty straight forward process in Java and Eclipse, simply being a matter of adding the pre-compiled JAR file from the “bin” folder of your OpenNI installation directory.
NOTE: If you plan on using User Tracking or another Primesense middleware capability you will need to add the JAR in the Primesense directory
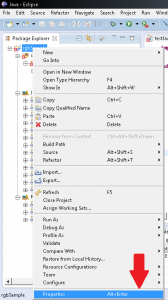
To do so right-click on the project we just created:
And select the “Properties” menu item.
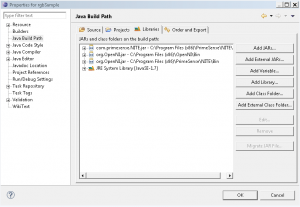
Then we will want to select the “Java Build Path” and “Add External Jar’s” button.
Repeat the same steps as above for the JavaCV JAR’s that you previously installed somewhere on your machine.
[/wptabcontent]
[wptabtitle] Eclipse with OpenNI: Adding the OpenNI Libraries Part 2[/wptabtitle] [wptabcontent]
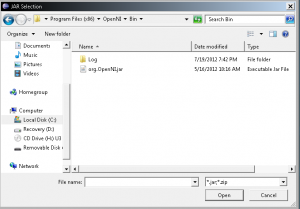
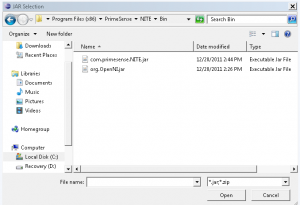
Navigate to the “bin” folders of the install directories for OpenNI and Primesense.
On my Windows 7 64-bit machine with the 32-bit install it is located here:
Note: There are TWO OpenNI “JAR” files – one in the bin folder of the OpenNI install directory as well as one in the Primesense directory. I haven’t noticed any difference in using one over the other; as long as your environment paths in Windows are set up to locate the needed files, they should both work.
After this, you should see these files in the “Referenced Libraries” directory on the “Package Explorer” tool bar in Eclipse.
[/wptabcontent]
[wptabtitle] Eclipse with OpenNI: Projects [/wptabtitle] [wptabcontent]
We should now be able to access the Kinect via Java and Eclipse.
In the following projects we will introduce and attempt to explain the necessary steps for initializing the Kinect via OpenNI and for getting basic access to its data feeds in Java.
Each project goes through setting up the Kinect in OpenNI and includes comments to explain line-by-line what is going on.
[/wptabcontent]
[wptabtitle] For information on Visual Studio 2010 & Microsoft C# SDK….[/wptabtitle] [wptabcontent]Using the Microsoft SDK provides a lot of advantages and ease of access, but it is also only applicable to the “Kinect for Windows” hardware and not the Xbox Kinect (as of v1.5).
There are a lot of existing tutorials on the web about setting up your development environment with plenty of sample projects. Below is a list of links to a few of them in no particular order as to avoid reinventing the wheel.
- http://channel9.msdn.com/Series/KinectQuickstart/Setting-up-your-Development-Environment
- http://social.msdn.microsoft.com/Forums/el/kinectsdk/thread/7011aca7-defd-445a-bd3c-66837ccc716c
- http://msdn.microsoft.com/en-us/library/hh855356.aspx
- Power Point from Stanford
[/wptabcontent]
[/wptabs]


