This page will show you how to use a Leica CS15 to configure a GS15 to be a base for an RTK GPS survey.
Hint: You can click on any image to see a larger version.
[wptabs mode=”vertical”]
[wptabtitle] Go to Base Menu[/wptabtitle]
[wptabcontent]
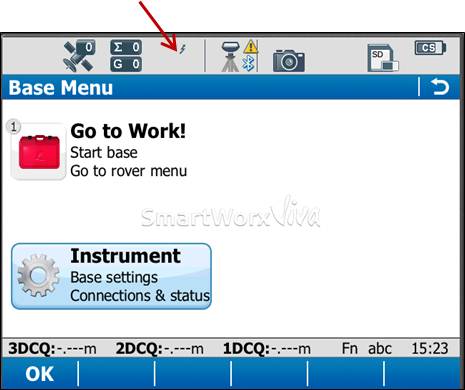
Look at the real-time status icon at the top of the CS15 controller screen. If you see a jagged arrow pointed up, the CS15 is in the base menu, where you want to be. If the arrow is pointed down, the CS15 is in the rover menu. To switch to the base menu, tap “Go to Work!” then tap “Go to Base menu.”
[/wptabcontent]
[wptabtitle] Satellite Tracking Settings[/wptabtitle]
[wptabcontent]
Once in the base menu, tap “Instrument” → “Base Settings” → “Satellite Tracking.”
![]()
In the Tracking tab, make sure that GPS L5 and Glonass are checked on. Also make sure “Show message & audio warning when loss of lock occurs” is checked. The Advanced tab allows you to define other options for the job, and it is appropriate to use the system default settings. Tap OK when finished. You will return to the Base menu.
![]()
[wptabtitle] Raw Data Logging Settings[/wptabtitle]
[wptabcontent]
On the base menu, tap “Instrument” → “Base Settings” →”Raw Data Logging.”
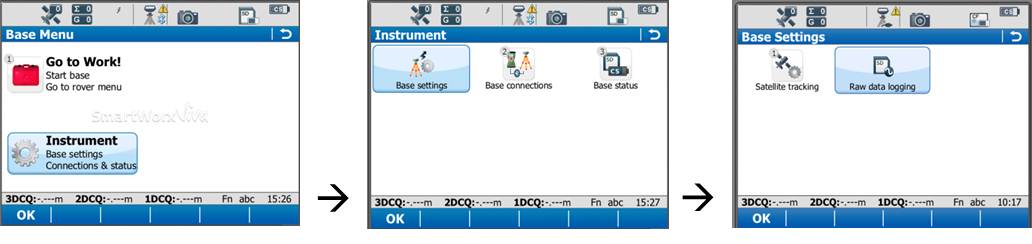
Make sure the box is checked for logging base data for post processing. Also confirm that the Data Type is in ‘RINEX’ format. Tap OK.

[wptabtitle] Enter Base Connection Settings[/wptabtitle]
[wptabcontent]
Back on the base menu, tap “Instrument” → “Base Connections” → “All other connections.”
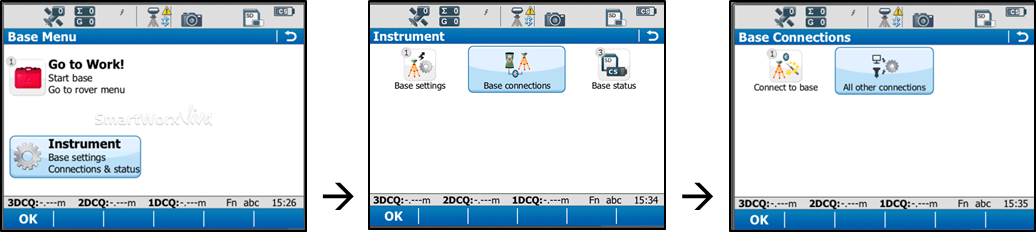
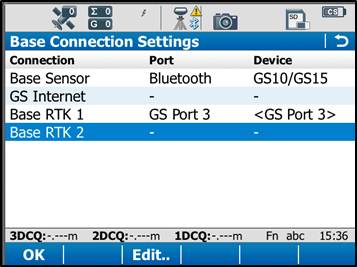
Tap the Base RTK 2 connection to highlight it, and then tap “Edit” at the bottom of the screen.
[wptabtitle] Base Connection Settings: General Tab[/wptabtitle]
[wptabcontent]
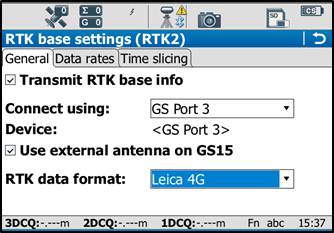
In the General tab, ensure the box is checked on for “Transmit RTK base info,” then verify the following settings:
Connect Using: GS Port 3
Device: RTK TEST (not as shown on graphic)
RTK Data Format: Leica 4G
Scroll down to see the checkbox for “Use External antenna on GS15.” Generally, you want to use the external antenna, so make sure to check this box.
[wptabtitle] Base Connection Settings: Data Rates Tab[/wptabtitle]
[wptabcontent]
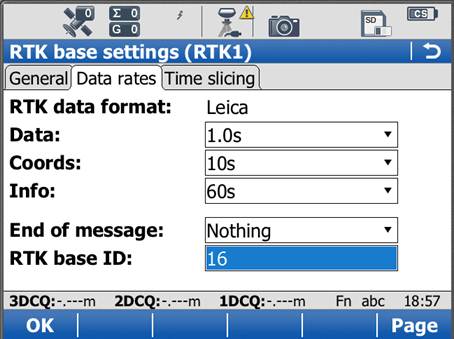
On the Data Rates tab, the default settings are generally fine, but double check the RTK base ID. It should be set to 16, and if it is, it can be left that way. Tap OK in the bottom left corner. Tap OK if a warning about the antenna pops up. Now tap “Cntrl” at the bottom of the screen.
Ensure the following settings are present:
Radio Type: Pac Crest ADL
Channel: 1
Actual frequency: 461.0250 MHz
* The “Actual frequency” will be set at “0.0000MHz” until the GS15 and CS15 are connected.
Tap OK. Tap OK again to return to the main menu.
[wptabtitle] Power up the GS15[/wptabtitle]
[wptabcontent]
Power up the GS15 receiver that you will be using as a base station (the one that has the SD card in it) by pressing and holding the power button until the 3 LEDs below it light up. Keep the other GS15 that will act as the rover turned off.
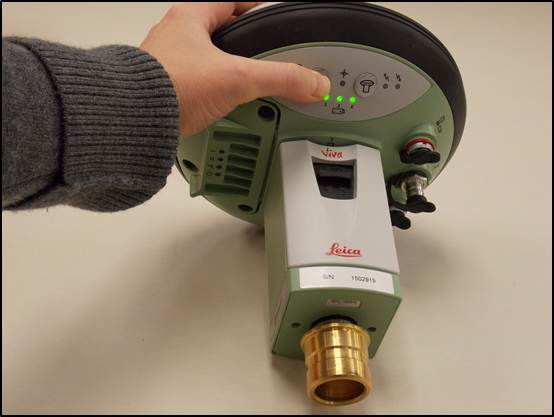
Note: It is important to understand what the buttons, symbols, and LED lights do and/or represent on the GS15 unit. A detailed description of button operation can be found in the Leica “GS10/GS15 User Manual” in section 2.1, pages 20-24. A detailed description of symbols and LEDs can be found in the same manual in section 3.5, pages 64-68. The GS15 is powered down by pressing and holding the power button until the LEDs turn red.
[wptabtitle] Put Base into RTK Mode[/wptabtitle]
[wptabcontent]
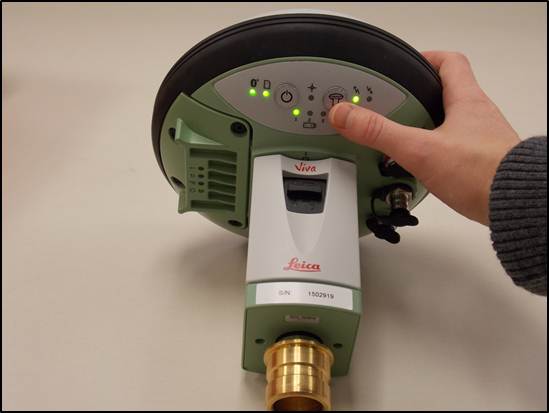
Make sure the GS15 unit is in RTK base mode, and set up to broadcast RTK corrections via the radio. To do this, check that the LED beneath the RTK base symbol (arrow pointing up) is lit up green. If the GS15 is in Rover mode (arrow pointing down), you may need to quickly press the function button to change it to Base mode.
[wptabtitle] Connect CS15 to GS15 via Bluetooth[/wptabtitle]
[wptabcontent]
The CS15 should automatically connect to the GS15 unit once it has entered base mode, via Bluetooth. On the CS15, you will see the Bluetooth symbol appear at the top of the screen. On the GS15, the LED beneath the Bluetooth symbol will turn blue.

If the CS15 does not automatically connect with the GS15, you can search for all visible Bluetooth devices. Navigate in the Base menu: ‘Instrument’ → ‘Base connections’ → ‘connect to base’ and click on the “search” button on the bottom of the screen. The “Found Bluetooth devices” screen will appear. The GS15 will be listed under the ‘Name:’ column, named after its serial number. The serial number can be found on a white sticker on the lower side of the GS15, under the battery cover (e.g. “S/N: 1502919”)
You may want to power down the GS15 by pressing and holding the power button until the LEDs turn red if you are in lab configuring but if in field then you can configure the RTK while base is on, BUT – be sure you are connected to the ROVER not the BASE. If you can confirm this by making sure that the Bluetooth connection is the correct serial number.
[wptabtitle] Continue To…[/wptabtitle]
[wptabcontent]
Continue to Part 4 of the series, “Leica GS15 RTK: Configuring a GS15 Receiver as a Rover.”
[/wptabs]