This page will show you how pre-process digital images for use in Close-Range Photogrammetry (CRP).
Hint: You can click on any image to see a larger version.
[wptabs style=”wpui-alma” mode=”vertical”] [wptabtitle] A BASIC INTRODUCTION [/wptabtitle]
[wptabcontent]
Why is pre-processing necessary?
For most close-range photogrammetry projects digital images will need to be captured in a RAW format, preserving the maximum pixel information which is important for archival purposes. Therefore it will likely be necessary to do some pre-processing in order to convert RAW images into a file format accepted by the photogrammetry software being used for the project.
If a color chart or gray card was using during image capture, it may also be useful to perform a white balance on the image set. There are a number of tools/software packages available for this purpose, but below we will describe a potential workflow using Adobe products for batch processing.
Overall steps of this workflow:
– Batch convert RAW to DNG (Adobe DNG Converter)
– Batch white balance (Camera Raw)
– Batch image adjustments (Camera Raw)
– Batch save to JPEG (or TIFF) format (Camera Raw)
[/wptabcontent]
[wptabtitle] BATCH CONVERT RAW DATA [/wptabtitle] [wptabcontent]
Batch RAW to DNG with Adobe Digital Negative (DNG) Converter Software
As an open extension of the TIFF/EP standard with support for EXIF, IPTC and XMP metadata, the Adobe DNG format is rapidly becoming accepted as a standards for storing raw image data (primarily from digital photography).
For more information about file formats for archival, see the Archaeological Data Service (ADS) Guides to Good Practice.
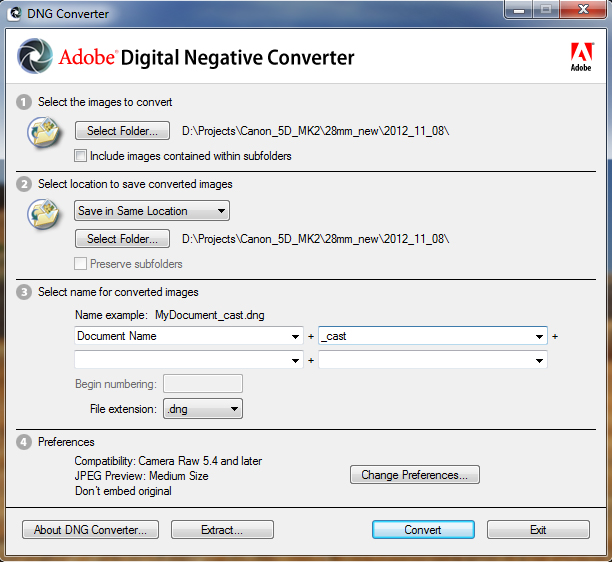
Steps to Batch Convert:
1. Download and install Adobe DNG Converter. As of the date this workflow was published, version 7.2 of Adobe DNG Converter is a free tool available for download on the Adobe website.
Adobe DNG Converter is a free tool available for download on the Adobe website.
2. This tool converts an entire folder (aka batch) of images at one time. Use the tool interface to select the appropriate input folder containing the RAW images.
3. If needed, use the interface to design a naming scheme to be used for the new file names.
4. Set preferences for compatibility (e.g. Camera Raw 5.4 and later) and JPEG Preview (e.g. medium size). As an option, you can embed the original RAW file inside the new DNG files. This will, or course, increase the file size of the new DNG file.
5. Click “Convert” to start the process. Wait for this to finish.
[/wptabcontent]
[wptabtitle] BATCH WHITE BALANCE – 1 [/wptabtitle] [wptabcontent]
Batch white balance, image processing, and exporting with Adobe – Part 1: Adobe Bridge
It is considered best practice to (correctly) use a quality color chart or gray card when capturing digital images for any CRP project. Performing a white balance for each image set (or each lighting condition) can dramatically enhance the appearance of a final product (i.e. ortho-mosaic). This particular workflow uses Adobe Bridge and the Adobe Camera Raw tool, but a similar process can be done in other (free) software as well.

Adobe Bridge – Open in Camera Raw
1. Open Adobe Bridge and navigate to the folder containing the digital images (DNG files).
2. Select the appropriate images (including images with color chart/gray card).
3. Use the “File” menu to select “Open in Camera Raw”
[/wptabcontent]
[wptabtitle] BATCH WHITE BALANCE – 2 [/wptabtitle] [wptabcontent]
Batch white balance, image processing, and exporting with Adobe – Part 2 : Camera Raw tool
4. Camera Raw will open and all of the selected images will appear on the left side of the window. Select the image with the color chart/gray card you would like to use for white balancing and other adjustments. Do all adjustments to this one image. We will apply the same changes to all images in the following slide ‘Batch Image Adjustment’.

Adobe Camera Raw – Image Processing Settings
5. By default, Camera Raw may attempt to apply a number of image processing settings that you should remove. This can be done using the interface on the right hand side of the screen. Check that all settings (with the exception of Temperature and Tint, which are set by the white balance tool in the next step) are set to zero. Be sure to check under each of the tabs.
6. Select the “Color Sampler Tool” found in tool bar at the top of the window and:
A. If using a color chart, add a color sample inside the black and white squares. After adding these you should see the RGB pixel values for each sample.
B. If using a gray card, add a color sample inside the gray portion of the card.
7. Select the “White Balance Tool” from the tool bar at the top of the window and click on the gray portion of the chart (or card) to apply a white balance. At the same time, notice how the RGB values of the color sample(s) change. The RGB values should not differ by more than five or six (e.g. the white sample could be R: 50, G: 50, B: 51). If they differ by too much there could be a problem with the white balance. Try clicking a slightly different spot in the gray portion of the chart.
8. If other adjustments need to be made (i.e. exposure, brightness, contrast) make them now.
[/wptabcontent]
[wptabtitle] BATCH IMAGE ADJUSTMENTS [/wptabtitle] [wptabcontent]
Applying adjustments to all
Once the white balance and adjustments have been made to this one image, we can apply the same to all the other images open in Camera Raw.
To do this, click “Select All” in the top left corner of the window – then click “Synchronize.” Wait for this to finish.
[/wptabcontent]
[wptabtitle] BATCH SAVE TO JPEG OR TIFF [/wptabtitle] [wptabcontent]
Saving
Once the Synchronization is complete, click the “Save Images” in the bottom left corner of the window (make sure all images are still selected). The “Save Options” dialog allows you to choose a folder for the images to be saved to, a naming scheme, a file extension and format, and a quality/compression. Choose the settings you prefer and click “Save.”
[/wptabcontent]
[/wptabcontent]
[wptabtitle] CONTINUE TO… [/wptabtitle] [wptabcontent]
Continue to PhotoScan – Basic Processing for Photogrammetry
[/wptabs]