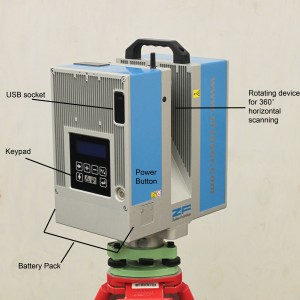
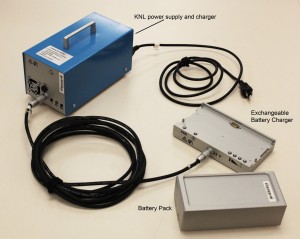
This workflow will show you how to setup the Z+F Laser Scanner prior to beginning your scan.
Hint: You can click on any image to see a larger version.
[wptabs style=”wpui-alma” mode=”vertical”]
[wptabtitle] INSTRUMENT’S COMPONENTS[/wptabtitle]
[wptabcontent]
Instrument’s Components
[wptabtitle] PRE-SCANNING CHECK[/wptabtitle] [wptabcontent]
Pre-scanning Check
1. Do not scan in rain, snow or fog
2. Protect scanner from excess moisture and rain
3. If temperatures are outside the calibrated range, an error message will display. Measuring accuracy cannot be specified if scanning proceeds
4. If the scanner is taken from a cold environment into a warm, humid one, the glass window and even the optic can fog up causing measurement error as does dust, and fingerprints
[/wptabcontent]
[wptabtitle] Z+F SCANNER SETUP[/wptabtitle]
[wptabcontent]
Z+F Scanner Setup
1. Set up tripod as stable and level as possible
*Never use the scanner without the tripod
2. Remove instrument from case with both hands, grasping the top with one hand on the handle and reaching under the base with the other in the space provided. Refrain from using the tribrach (base mount) to lift with as it can turn unexpectedly
3. Place instrument on tripod and secure
Always keep one hand on the handle until the scanner is firmly attached to the tripod
4. Level using the leveling screws and built-in bubble level (you will also check the level under the Tilt menu on the instrument once it is on)
5. Power Supplies: A) Li-Ion Battery Pack B) KNL-24 when working near a electric outlet
6. Check to verify that the lens is perfectly clean
[/wptabcontent]
[wptabtitle] M-CAM SETUP[/wptabtitle] [wptabcontent]
M-Cam Setup
1. Mount the M-Cam to the top of the scanner, upright on the same side of the scanner as the keypad and display
2. Align the two adjustment pins on the scanner with the corresponding holes in the camera mount base and fasten to the screw thread in between the pins
3. Remove the port cover that reads “Press”
4. Connect the two USB cables from the M-Cam to the USB ports. There is no particular order
5. Connect the Lemo-Plug to the right hand 7 pin connector port (it is marked with an “M”)
6. Remove the lens cover
7. Place the gray card on the magnetic on the corresponding magnetic plate on the scanner below the lens. The red dot should be nearest to the edge in the view of the camera
8. After each scan, the M-Cam will collect three sets/rotations of pictures in the vertical direction starting with the lowest rotation first.
[/wptabcontent]
[wptabtitle]CONTINUE TO…[/wptabtitle]
[wptabcontent] Continue to part 2 in the series, Z+F Laser Scanner: Starting Your Scan.
[/wptabcontent]
[/wptabs]

