This page will show you how to use a Leica CS15 to configure a GS15 to be a rover for an RTK GPS survey.
Hint: You can click on any image to see a larger version.
[wptabs mode=”vertical”]
[wptabtitle] Power up the GS15 Rover[/wptabtitle]
[wptabcontent]
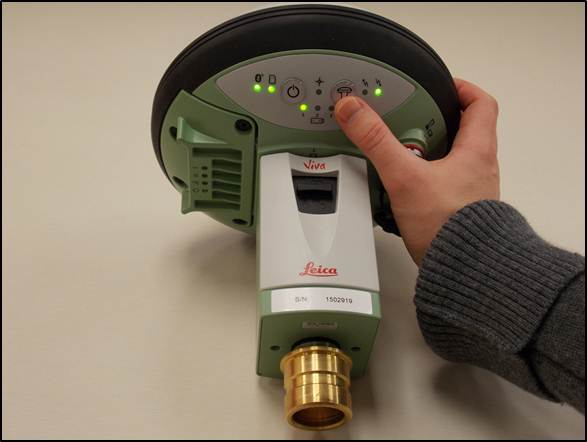
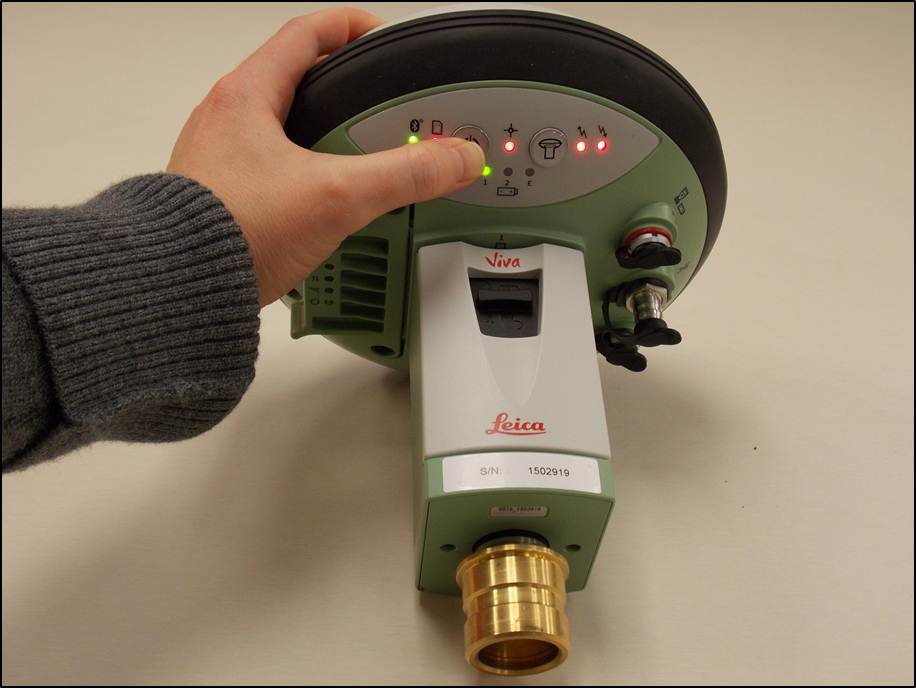
Power on the second GS15 receiver – this will be the Rover – and wait for it to start up, then make sure the RTK Rover (arrow pointing down) LED lights up green.
[/wptabcontent]
[wptabtitle] Configure CS15 for Rover[/wptabtitle]
[wptabcontent]
You should probably be at the Base Menu and “Go to Work” (on right) If not you may be in the Job: “Your name” menu and the “Go to Work” button has “Survey & State Points” and “Start Base” as shown below on left.
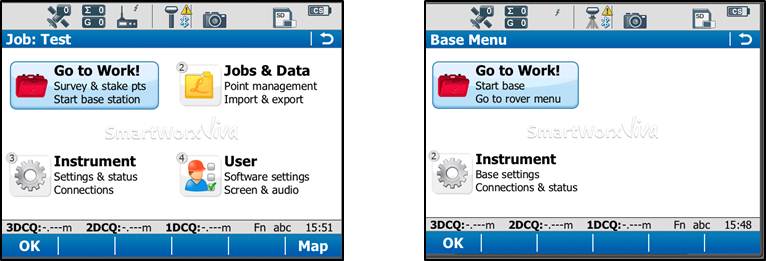
If you have the left screen (Job: TEST –or whatever you named the job– and “Start Base Station”) you simply need to click on the Go to work” and then select “Go to Base menu” – that will take you to the situation shown on the RIGHT image.
[/wptabcontent]
[wptabtitle] Go to Rover Menu[/wptabtitle]
[wptabcontent]
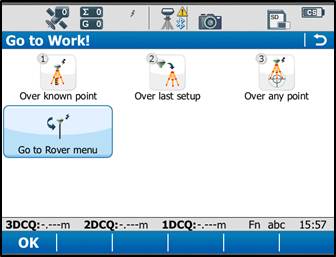
From the main menu, tap “Go to Work!” then “Go to Rover menu.” The unit will take a few moments to connect to the GS15 rover unit. Note: Tap “No” if the Bluetooth connection Warning appears.
[/wptabcontent]
[wptabtitle] Satellite Tracking Settings[/wptabtitle]
[wptabcontent]
Once in the rover menu, tap “Instrument” → “GPS Settings” → “Satellite Tracking.”
![]()
In the Tracking tab, make sure that GPS L5 and Glonass are checked on. Also make sure “Show message & audio warning when loss of lock occurs” is checked. The Advanced tab allows you to define other options for the job, and it is appropriate to use the system default settings. Tap OK when finished.
![]()
[/wptabcontent]
[wptabtitle]Quality Control Settings[/wptabtitle]
[wptabcontent]
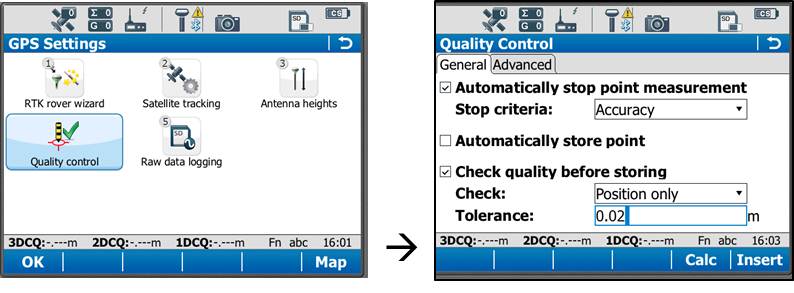
On the rover main menu, tap “Instrument” → “GPS Settings” → “Quality Control.” Here you can define your specifications for RTK point collection with the rover unit. For high precision survey work, it is a good idea to set the tolerance to less than or equal to 2 centimeters, as this will prevent the logging of an RTK point with error greater than this threshold. Tap OK to return to the main menu when finished.
[/wptabcontent]
[wptabtitle]Raw Data Logging Settings[/wptabtitle]
[wptabcontent]
On the rover main menu, tap “Instrument” → “GPS Settings” → “Raw Data Logging.” Be sure the box for “Log data for post processing is checked on, then choose where you would like the data to be logged to. We can log to either the receiver’s (GS15) SD card or the controller’s (CS15) SD card. Make sure the controller option has been selected from the drop down list. The remaining options are up to the user to define. Tap OK when done.
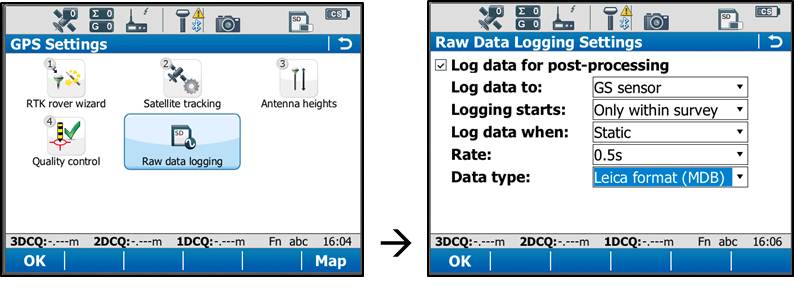
[/wptabcontent]
[wptabtitle]RTK Rover Settings: General Tab[/wptabtitle]
[wptabcontent]
On the rover main menu, tap “Instrument” → “Connections” → “All other connections.” On the GS connections tab, tap the RTK Rover connection to highlight it, and then tap “Edit” at the bottom of the screen.
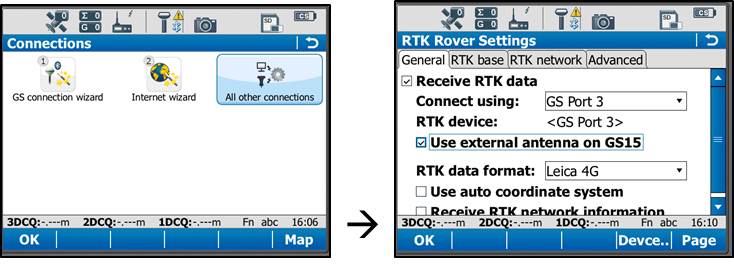
On the General tab, make sure the “Receive RTK data” box is checked on, then verify the following settings:
Connect Using: GS Port 3
RTK Device: Pac Crest ADL (note: different than shown in image above)
(Check on “Use external antenna on GS15”)
RTK Data format: Leica 4G
(Leave the remaining 2 boxes unchecked)
[/wptabcontent]
[wptabtitle]RTK Rover Settings: RTK Base Tab[/wptabtitle]
[wptabcontent]
On the RTK base tab, verify the following settings:
Sensor at base: Automatically Detect
Antenna at base: Automatically Detect
(Check on “RTK base is sending unique ID”)
RTK base ID: 16

Tap OK in the bottom left corner. Tap OK if a warning about the antenna pops up. Now tap “Cntrl” at the bottom of the screen. Ensure the following settings are present:
Radio Type: Pac Crest ADL
Channel: 1
Actual frequency: 461.0250 MHz
Tap OK. Tap OK again to return to the main menu.
[/wptabcontent]
[wptabtitle]Finish Setup[/wptabtitle]
[wptabcontent]
At this point the equipment is set up. Now you can begin to take RTK points. You can begin your work or you can power down the CS15 by holding the power button down until the power options menu appears, and select “Turn off.” You can also power down the GS15 receiver by holding the power button until the LEDs flash red.
[/wptabcontent]
[wptabtitle]Continue To…[/wptabtitle]
[wptabcontent]
Continue to “Leica GS15: Tripod Setup”
[/wptabcontent]
[/wptabs]