This series of posts will teach you how to navigate in Unity and to create a basic virtual museum.
Hint: You can click on any image to see a larger version.
[wptabs mode=”vertical”] [wptabtitle] Get Some Scripts[/wptabtitle] [wptabcontent]This tutorial will describe a basic setup for adding simple interactions to the walkable demo we created in the previous tutorial. To do this, you’ll use several scripts contained in the package you can download here.
Have Unity open with the project used in the last tutorial
Download it and double click on it with Unity open.
Import all the scripts.[/wptabcontent]
[wptabtitle] Script Documentation[/wptabtitle] [wptabcontent]
The scripts are documented, if you would like to view them and learn more. You can find additional resources concerning the Scripting API in Unity at the Unity Script Reference page. [/wptabcontent]
[wptabtitle] Unity Scripting Languages[/wptabtitle] [wptabcontent]Unity allows you to create in scripts in three languages: JavaScript, Boo, and C#.
JavaScript is well known for web scripting and is part of the same standard as Flash’s ActionScript. Unity’s JavaScript has notable differences, but it provides the easiest way to interface with GameObjects.
C# is native to .NET and the Mono project, which Unity is based on. It provides many advance options that JavaScript lacks.
Boo is a lesser known language. Not many people code in Boo, but it has many similarities to Python.
[/wptabcontent]
[wptabtitle] The Museum Scripts[/wptabtitle] [wptabcontent]The package contains three scripts:
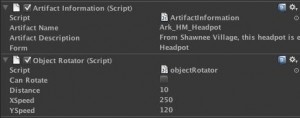
ArtifactInformation.js : This is a basic data repository script. When you add it to a GameObject, you’ll be able to enter basic information about the object in the inspector that can be shown when the user clicks on the object. Place it on each artifact you wish to interact with.
We could obtain the information in a number of ways, MySQL database, XML, etc. For this demo, we are mainly worried with what to do with the data once we receive it.
ObjectRotator.js : This script allows us to rotate the object when we click on it. It also needs to be attached to each object you want to interact with.
ArtifactViewer.js : This script is attached to the FPC’s main camera. This script will detect if we are looking at an object when we left mouse click. If an object is in front, it will deactivate the FPC, show the information of the object and activate object rotate mode. It must go on the Main Camera inside the First Person Controller. [/wptabcontent]
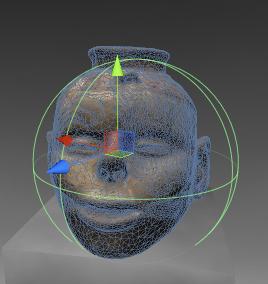
[wptabtitle] Setup a Sphere Collider[/wptabtitle] [wptabcontent]We need to perform several steps to prepare the script for activation. I assume you have placed an artifact on one of the pedestals in the museum. Be sure to make the scale factor of .005. Otherwise, hilarity will ensue. Leave the Generate Colliders box unchecked.
Add a Sphere Collider
1. With the object selected, go to Components > Physics > Sphere Collider

This allows us to detect if we are in front of the object.
[/wptabcontent]
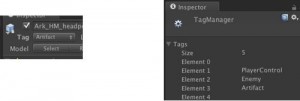
[wptabtitle] Add New “Artifact” Tag[/wptabtitle] [wptabcontent]1 .With the object selected, go to the top of the Inspector and click the drop down menu next to Tag and click Add Tag.
2. Open the Tag hierarchy and in Element 3, add the text “Artifact”.
3. Go back to the object’s properties in the Inspector, and make sure the newly created “Artifact” tag appears in the Tag drop down menu.
4. Do this for all artifacts you wish to interact with.
5. Select the FPC and assign the “Player” tag to it. The “Player” tag should already exist in Unity
[/wptabcontent]
[wptabtitle] Attach Scripts[/wptabtitle] [wptabcontent]1. Find the folder “Museum Scripts” in the Project panel.
2.Drag the scripts “ArtifactInformation” and “ObjectRotater” to each object you wish the user to interact with.
3.The “ArtifactViewer” script has to go in a special place on the FPC. Expand the FPC in the Hierarchy panel and locate the “Main Camera” inside of it.
4.Drag the ArtifactViewer on to the “Main Camera.” [/wptabcontent]
[wptabtitle] Add info about the artifacts[/wptabtitle] [wptabcontent]Now if you select the artifact, you’ll find where you can enter information about the artifact. You can copy and paste data from the Hampson site or come up with your own.
NB: Although the Artifact Description doesn’t show much of the text, it really does have a block of text in it.
[/wptabcontent]
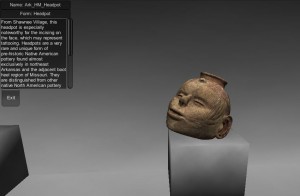
[wptabtitle] Finished Museum Demo[/wptabtitle] [wptabcontent]Now if you click Play, you can click on the object and a GUI with information appears. Left clicking will also allow you rotate the model. If the rotation seems off, the pivot point may not be in the center.

You should now have a simple walkthrough demo of a museum.
This project was designed as a launching platform for more ambitious projects.
[/wptabcontent] [/wptabs]


