[wptabs style=”wpui-alma” mode=”vertical”]
[wptabtitle] INTERFACE BASICS[/wptabtitle]
[wptabcontent]
Z+F Laser Control Interface Basics

Figure 1: Laser Control Toolbars
[/wptabcontent]
[wptabtitle]VIEWING A SCAN IN 3D[/wptabtitle]
[wptabcontent]
1. To view a scan in 3D, RC in the 2D View and select Points to 3D (this gives you the most options), you can also select Full Scan to 3D (automatically subsamples) or Selection to 3D(automatically subsamples). In the Points to 3D options the Subsample factor is the key element to adjust. The default subsample is 0 which is automatic. If you want to see all of the data, set it to 1 (1/1) if you want it subsampled, set it to 4 (1 point is displayed for every 4) or 8 (1 for every 8). You can also filter by intensity and range and also do basic Mixed Pixel filters here. Remember this only filters that what you SEE in the 3D Window and doesn’t actually filter the data at all.

Figure 2: Points to 3D options
[/wptabcontent]
[wptabtitle]OPTIONS FOR 3D VIEW[/wptabtitle]
[wptabcontent]2. Look at the image for other options in the 3D View. Note: The 3D View is cumulative – data is added each time it is exported from a 2D view. To clear it, RC in the 3D window and choose Clear View.
In the Points to 3D options the Subsample factor is the key element to adjust. The default subsample is 0 which is automatic. If you want to see all of the data, set it to 1 (1/1) if you want it subsampled, set it to 4 (1 point is displayed for every 4) or 8 (1 for every 8). You can also filter by intensity and range and also do basic Mixed Pixel filters here. Remember this only filters that what you SEE in the 3D Window and doesn’t actually filter the data at all.
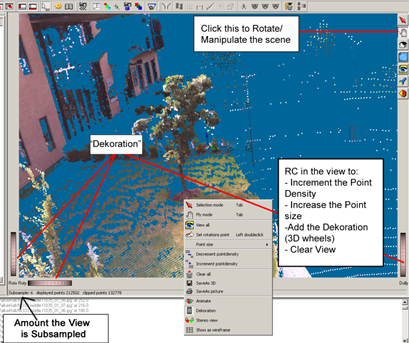
Figure 3: Points to 3D Options
[/wptabcontent]
[wptabtitle]CONTINUE TO…[/wptabtitle]
[wptabcontent]Continue to Z+F Laser Control: Color Mapping[/wptabcontent][/wptabs]