The chief differences between Unity Indie and Unity Pro lies in the ability to optimize your scenes and the ability to create scable worlds. Its significant to point out that most of these features in Unity Pro can be imitiated to a certain degree in Indie using code and modeling software.
[wptabs mode=”vertical”] [wptabtitle] Intro to Static Batching[/wptabtitle] [wptabcontent]Graphics cards can process many polygons with relative ease. The texture mapped onto those polygons tend to be the source of rendering and performance problems. Whenever you test out your Unity application by hitting play, Unity renders on screen everthing that is aligned with the camera (or view frustrum). Every object using a different material within the field of vision gets sent to the graphics card for processing. Unity does this in passes. Everything in the back is rendered first working its way to the front.
Every object getting sent one by one to the GPU is a fairly inefficient procedure. If there are a number of individual models pointing to the same material, Unity can combine these models at runtime reducing the amount of data that is sent to the GPU. Unity in effect renders or “draws” these combined meshes in one batch or “call”. Unity does this to some degree already with dynamic batching (included in the indie version). But the most significant gains come when you can tell Unity which models you’d like grouped together. This is where static batching comes in (only available in the Pro version).
[/wptabcontent]
[wptabtitle] Tag a Static Batch Object[/wptabtitle] [wptabcontent]When you tag an object as static batched, then Unity will group that object in with other objects that share the same material.
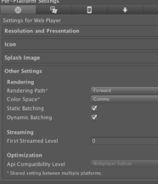
Go to Edit > Project Settings > Player
Check Static Batching
[wptabtitle] Specify the models[/wptabtitle] [wptabcontent]Now you’ll want to tell Unity which models should use static batching. Remember, static batching is only effective on models that share the same texture and material. Duplicates of objects and models using texture atlases are your prime targets.
[/wptabcontent]
[wptabtitle] Static Batching Statistics[/wptabtitle] [wptabcontent]
-Select a prefab in the Project panel or select a GameObject in the Hierarchy.
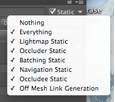
-In the top right corner of the Inspector, click on the triangle next to Static. A drop down menu appears. Select Batching Static. We’ll talk about some of the other static options in a moment.
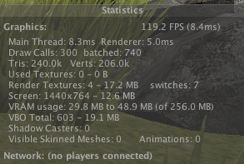
-When you click play, you can see how many models are being batched at any given time by click on the Stats button in the upper right corner of the Game panel. You should see a decrease in the Draw Calls also when you enable Static Batching.
[/wptabcontent]
[wptabtitle] Introducing Occlusion Culling [/wptabtitle] [wptabcontent]I mentioned above that Unity renders everything in the back first and then everything towards the camera. This means that if you look at a wall in Unity everything behind that wall is getting rendered as well and affecting performance. This seems inefficient and impractical. You could have a sprawling city behind that wall and have it affecting your performance. This is where occlusion culling comes in.
Occlusion culling keeps track of what is visible from any given location via a 3D grid of cells called Potentially Visible Set (PVS). Each cells contains a list of what other cells are visible and which are not. Using this information, Unity can render only that which is visible significantly decreasing the amount of data that needs to be processed to render the scene.
Setting up occlusion culling is fairly straightforward, but keep in mind, depending on the scale of your scene, the baking process could take from 30 minutes to a couple of hours.
[/wptabcontent]
[wptabtitle] Setting up Occlusion Culling[/wptabtitle] [wptabcontent]1. Select all the stationary GameObjects
2. In the top right corner of the Inspector, click the triangle next to “Static
3. Select “Occluder Static”
4. Drag and drop your First Person Controller into the scene.
5. Now go to Window > Occlusion Culling
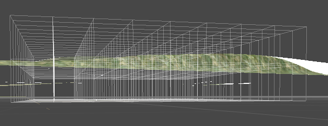
A new window opens called “Occlusion” along with a 3D grid in the scene view. The 3D grid represents the size of the cell grid the OC process will use. As it stands, the entire scene will be used in occlusion culling.
[/wptabcontent]
[wptabtitle] Bake Occlusion Culling[/wptabtitle] [wptabcontent]6. Click on the “Bake” tab. You’ll see the settings for the Occlusion Culling.
7. Click on “Bake” and go get some lunch. When the baking finishes, click Play and make sure you do not have geometry that suddenly appears and disappears. You can move the Game view so that it is adjacent to the Scene view. You can see how only the geometry you are viewing in the Game view is the only geometry visible in the scene view and whenever you rotate and move the geometry appears and reappears as needed. This should drastically reduce any frame rate issues. [/wptabcontent]
[wptabtitle] Introducing Lightmapping[/wptabtitle] [wptabcontent]When you have lights casting realtime shadows in your scene, the frame rate can be greatly affected as every pixel of an object reflecting light has to be calculated for the right affect and the shadows have to be calculated as well. Lightmapping is a process that “bakes” or draws the shadows and lighting effects onto the textures of an object so that at runtime no light calculations need to be processed. An additional advantage is also that lightmapping can add ambient occlusion to a scene that adds an element of realism and softness to the scene. The setup is similar to Occlusion Culling, but it can take even longer. This is very much an all night process, so be sure to start it before leaving the day, if the scene is large or uses many materials.
As with everything else, you must tag the objects you want to have a lightmap for.
[/wptabcontent]
[wptabtitle] Setting up Lightmapping[/wptabtitle] [wptabcontent]1. In the top right corner, click on the triangle next to “Static” and check “Lightmap Static”
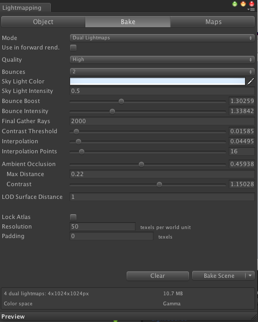
2. Go to Window > Lightmapping
3. Click on the Bake tab. The settings for lightmapping appear and at first glance they are daunting. For most situations though, the default settings should do fine. The main thing to look for is to see that “Ambient Occlusion” is at least .4 if you want to add Ambient Occlusion to your scene.
5. Click Bake and call it an evening (depending on the scene size)
