The following post describes in detail the basic steps for acquiring close-range digital images for a generic photogrammetric project.
[wptabs mode=”vertical”] [wptabtitle] In Office Setup: Begin the Metadata Process[/wptabtitle] [wptabcontent]
- Choose a method for documenting the project (e.g. paper, laptop)
- Fill in known project metadata items (e.g. project name, date of survey, site location, etc.)
- Create a sketch map of the area (by hand or available GIS/maps)
[/wptabcontent]
[wptabtitle] Plan project and prepare equipment[/wptabtitle] [wptabcontent]
- Develop a project plan based on desired end product and required accuracy (review CRP steps if needed)
- Decide what equipment will best suite the project (e.g. what camera? what lens? method for white balance?)
- Print and check off items for close-range photogrammetry checklist
- Print other applicable metadata forms and have ready
[/wptabcontent]
[wptabtitle] In Field Setup: Configure Camera Settings[/wptabtitle] [wptabcontent]
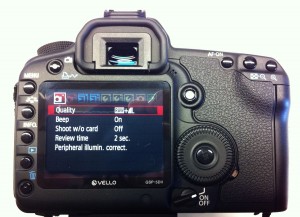
- Photo quality (RAW and JPEG Large)
- White balance (custom or auto)
- Auto rotate (off)
- Live View function (stills only)
- Mirror lock up (enabled) *recommended for shutter speeds longer than 1/30th
- Self-timer (2 or 10 second)
- Turn off any image stabilization features
[/wptabcontent]
[wptabtitle] In Field Setup: Set Focus[/wptabtitle] [wptabcontent]
- Though some projects may require an auto focus for each image, in an ideal project the focal length (and therefor focus) of the lens will remain constant throughout a CRP image set.
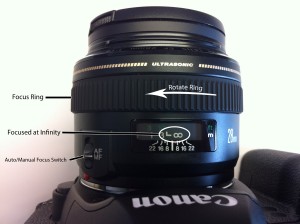
- For architectural photogrammetry, or other projects with a distance of more than 10 meters between the camera and object, find the switch on the lens with “AF” and “MF” and switch to MF (Manual Focus), then manually rotate and secure the focus ring to infinity
- For projects with a shorter, constant distance (e.g. all photos will be captured from 6 meters), autofocus the lens for the first photo, then switch the lens to manual focus and secure that focus setting for all remaining photos
- For projects with a shorter, varying distance (e.g. photos will be captured anywhere from 2-5 meters), use autofocus for all images
- Turn the Mode Dial to “Av” (Aperture value) mode
- Set aperture to appropriate value (between F8 and F16)
- Take test photo and check for sharpness throughout the object of interest
- Adjust settings as necessary
[/wptabcontent]
[wptabtitle] Taking the Photos: Setting Up[/wptabtitle] [wptabcontent]
- Have documentation materials ready
- As you collect images, document the process according to ADS
- Make sure you capture a color checker chart, gray card, or other means of white balancing the images in the lab
- Choose appropriate photo location
- Obstructions between the camera and object should be minimized
- The tripod should be stable and should not move throughout the image capture
[/wptabcontent]
[wptabtitle] Frame and Take the Photo[/wptabtitle] [wptabcontent]
- Frame the Photo
- Adjust the tripod head to position the aim of the camera
- The object should fill the frame
- Press the shutter button
- Pressing the button should initiate the mirror lockup, followed by the timer and image capture
- You should hear one thump, a series of beeps, and then the shutter
- Review the image for sharpness and exposureset.
- By default, the camera will display the image for a few seconds
- If the LCD goes black, push the Playback button to review
- Push the Magnify button to zoom in, and pan across the image
- Be sure to review objects both near and far for sharpness
- Look at the histogram and make sure the brightness values are well distributed and not clipped
[/wptabcontent]
[wptabtitle] Reconsider your Settings[/wptabtitle] [wptabcontent]- If the image is not sharp make sure you’re choosing appropriate aperture
- Is your aperture too large (meaning the f/ number is small)? Maybe try one or two stops smaller (e.g. from f/10 to f/16)
- Did the tripod move during image capture? With small apertures, you can expect long exposure times. Be sure the tripod remains 100% motionless during the entire exposure
- Did you have an extremely long exposure? More than 10-20 seconds? This could indicate you aperture is too small (e.g. f/22 or a higher number) for the amount of available light, or you are suffering from diffraction as light passes the aperture. Stop down closer to f/16 and try again
[/wptabcontent]
[wptabtitle] If the image is sharp…[/wptabtitle] [wptabcontent]Move to the next location (according to your strategy) and repeat.[/wptabcontent][/wptabs]
- Review the image for sharpness and exposureset.
