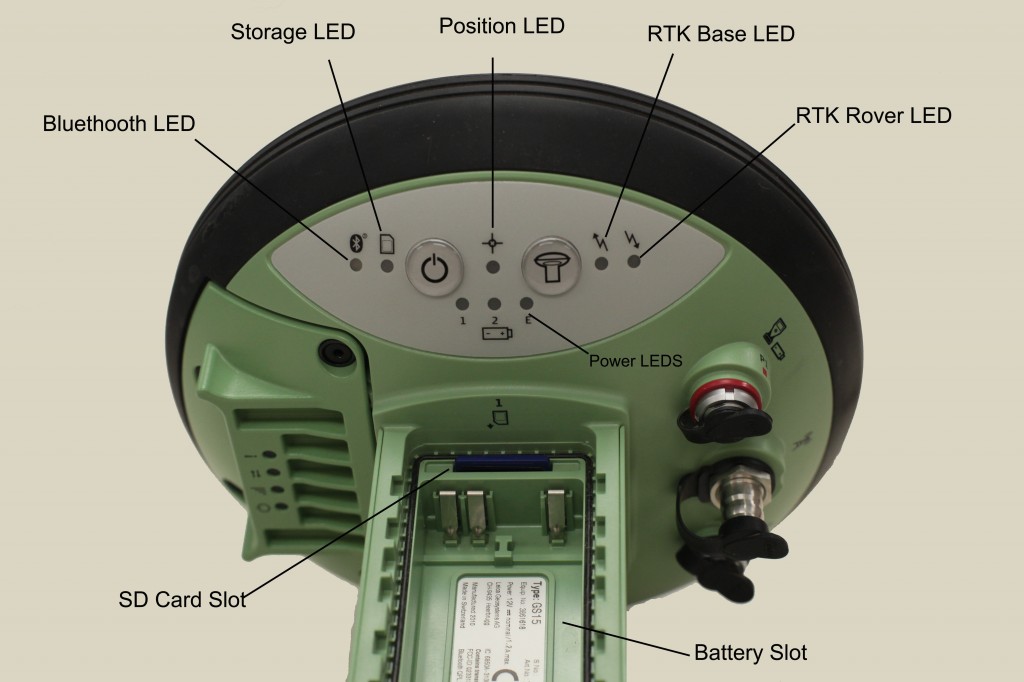
The following instructions explain how to do a “quick” set up for a previously configured system.
Hint: You can click on any image to see a larger version.
[wptabs style=”wpui-alma” mode=”vertical”] [wptabtitle] GENERAL INFO [/wptabtitle]
[wptabcontent]
Under many situations you can use only the GS15s buttons to create a base station and/or a base-rover RTK system if they have been previously configured using the data logger. If you power them down they retain the last configuration.
The following instructions explain how to do a “quick” set up for a previously configured system. In general, however, it is wise to also use the data logger since you can then more precisely monitor status and insure operation. (For more details on operation of GPS using only unit’s buttons see pages 36-37 and 21-24 of GS15 User’s manual)
The next section provides details on how to use the data logger to configure the GS15 if the current configuration is not what you wish to use.
[/wptabcontent]
[wptabtitle] SET UP BASE STATION [/wptabtitle] [wptabcontent]
Set up base station
I. General
A. Any unit with a PC radio can serve as base station
B. Set up tripod (see GPS tripod set up workflow) and attach GPS
C. If using the external antenna you will need to set up a second tripod to serve as the antenna mast. See page 21 of the Viva GNSS Getting Started Guide.
[/wptabcontent]
[wptabtitle] START BASE STATION[/wptabtitle] [wptabcontent]
II. Start base station
A. Press ON/OFF button for ca 2 sec
i. LEDs all flash on
ii. Release ON/OFF button
iii. LEDS will flash in a cycle
iv. WAIT for booting till power LEDs are normal (see page 64-67 of GS15 User’s manual).
v. In normal mode (See figure for LED labeling)
a. one (or two) of the battery LEDs will be lit,
b. the incoming/outgoing LEDs will flash
c. the SD data LED will flash
d. And the position LED will be yellow (though this takes a bit longer)
B. Once Power LEDs are normal, confirm that unit is in base mode. LED beside outgoing arrow is blinking (LED “e” in figure below)
i. If not then press and hold FUNCTION button (large button with GPS antenna symbol) for ca less than one (1) second. The unit will switch between base and rover mode.
a. Rover mode has LED lit beside incoming arrow (“f” in figure below), base has LED lit beside outgoing arrow (“e” in figure below).
b. Incoming arrow (rover mode) is one farthest from the FUNCTION button
c. Outgoing (base mode) arrow is one nearest FUNCTION button
[/wptabcontent]
[wptabtitle] BASE MODE LED [/wptabtitle] [wptabcontent]
C. If the base mode LED (outgoing arrow) is:
i. OFF – the unit is not in base mode but in RTK rover – press FUNCTION to switch to base mode – check LEDs again
ii. Green – the unit IS in base mode but NO DATA is being sent to radio
a. Data will NOT be sent UNTIL the position is available (see Position LED)
ii. Flashing green – unit in base mode AND data is being sent.
a. WARNING – the unit may flash very slowly!
b. When data is being sent to the radio the data transfer LED on the RADIO should also be flashing green. The data transfer LED is the one beside the two arrow symbol on the base of the radio. If the LED is off the radio is not operating.
1. Details on Radio LED status is on page 60-63 of GS15 user manual.
2. NOTE – unit is SLR3-1 with Pacific Crest radio – be sure to read the configurations for the PC entry in the “on” column for proper configuration.
[/wptabcontent]
[wptabtitle]POSITION LED [/wptabtitle] [wptabcontent]
D. If the Position LED is:
i. OFF – no satellites are being tracked and/or unit is off
ii. Flashing yellow – less than four (4) satellites are tracked, no position available
a. It may take a bit after you power up the unit for tracking to begin. This is especially true if the unit has been off for a while or if it is being restarted in an entirely new location. The delay is because the almanac has to be downloaded/updated.
iii. Yellow – a navigated position is available
a. If you are setting up over ‘any point’, that is you don’t know the coordinates of the base from some outside source(s) (e.g. NGS benchmark, then only a navigated position (for the base) will be developed but the rover will be able to display green (fixed RTK) because the relationship between the base and rover is known with precision.
b. Typical readings for a base in navigation mode are in the order of 0.5 to 2 meters for 2nd order while the rover using the base will have values of 10-30 millimeters!
c. It is possible to set up a base over ‘any point’ acquire at least 20 minutes of good data, process it via OPUS (see that work flow) and then after receiving the OPUS result return and re-locate the base over the same point but now use the KNOWN point option, using the OPUS provided coordinates.
iv. Flashing green – a code-only position is available
a. You will NOT get either a flashing or a solid green one at the base station if you are over any point (ie. unknown location)
b. The rover WILL have flashing green or green but NOT the base
v. Green – a fixed RTK position is available
a. Only when a position is available will the transmit buttons flash
b. This may take a few minutes.
[/wptabcontent]
[wptabtitle]CONTINUE TO… [/wptabtitle] [wptabcontent]
To set up rover, see Configuring a GS15 Receiver as a Rover
[/wptabcontent]
[/wptabs]
