[wptabs style=”wpui-alma” mode=”horizontal”]
[wptabtitle]Get the size of an object[/wptabtitle]
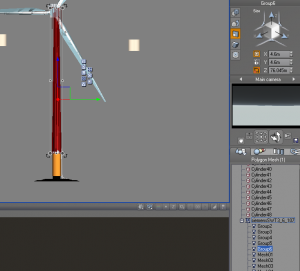
[wptabcontent]Getting the actual size of an object in Vue programmatically isn’t as easy as you’d think. You essentially have to get the BoundingBox of the object and work with that. So here we have a wind turbine object, and we have selected the pole and need to know (programmatically) how tall this pole really is.
If you look at that z-value in the size properties, you see that it’s 76.045m tall. To get that height programmatically (result on line 21):
#
#
>>> col = GetSelectedObjectByIndex(0)
>>> col
>>> scale = col.GetScale()
>>> print scale
(1.0, 1.0, 1.0)
>>> bb = col.GetBoundingBox()
>>> print bb
<VuePython.VUEBoundingBox; proxy of <Swig Object of type 'VUEBoundingBox *' at 0x0000000017884360> >
>>> print bb.GetMax()
(4024.3647753980426, -9026.798040135702, 216.7754350035159)
>>> print bb.GetMin()
(4019.764775016573, -9031.39804242452, 140.730600866553)
>>>

# Do the math

>>> z_size = bb.GetMax()[2] - bb.GetMin()[2]
>>> print z_size
76.044834137
>>>

# Make a dict out of em

>>> d = {}
>>> d['Min'] = bb.GetMin()
>>> d['Max'] = bb.GetMax()
>>> print d
{'Max': (4024.3647753980426, -9026.798040135702, 216.7754350035159), 'Min': (4019.764775016573, -9031.39804242452, 140.730600866553)}
>>>
>>> print d['Max'][2]
216.775435004
>>>
#
#
[/wptabcontent]
[wptabtitle] Multiple cameras[/wptabtitle]
[wptabcontent]
Turns out there is no Python method in the Vue API for creating a camera. In order to create cameras, you can duplicate the Main camera and then call your custom cameras by index, where the index is the ID number of the camera.
#
#
# Dict of KOPs and attributes
# {KOP ID: (northing, easting, cam z position, FoV,
#           camera yaw, camera pitch,  sun pitch, sun yaw)}
d = {5: ('15980.6638981', '6893.65640636', '3.7', 'Center',
         '344.064664362', '93', '116.821439116', '120.778962736'),
     6: ('8647.62696908', '27858.4046614', '3.7', 'Center',
         '283.801779018', '93', '116.693562607', '120.534961058')}

# Create new cameras by duplicating Main camera for each KOP
for k in d.iterkeys():
    sc = SelectByName("Main camera")
    camera = GetSelectedObjectByIndex(0)
    Duplicate()
    DeselectAll()

# Set start position to 2, as its zero based indexing and Main camera is 0,
#  Top camera is 1, so our first custom camera will be 2
cam_start_pos = 2

# For each pair in kop dict, map it to a new dict, where key is camera
#  index and value is kop dict kv pair
#  {2:{'5': ('15980.6638981', '6893.65640636', '3.7', 'Center',
#            '344.064664362', '93', '116.821439116', '120.778962736')},
#   3:{'6': ('8647.62696908', '27858.4046614', '3.7', 'Center',
#            '283.801779018', '93', '116.693562607', '120.534961058')}}
i = 2
cams_kops = {}
for k, v in d.iteritems():
    cams_kops[i] = dict([(k, v)])
    i+=1

# Get the kop id (its a dict key) for a given camera id
cams_kops[2].keys() # 5

# Setup the camera for each KOP
select_camera = SelectByName("Main camera")
for k, v in cams_kops.iteritems():
    if SwitchCamera(k):  # k is camera id
        #kop_id = cams_kops[k].keys()[0]
        kop_attributes = cams_kops[k].values()[0]
        camera = GetSelectedObjectByIndex(0)
        camera.SetPosition(float(kop_attributes[1]),
                           float(kop_attributes[0]),
                           float(kop_attributes[2]))
        Refresh()
        camera.SetRotationAngles(float(kop_attributes[5]),
                                 0, float(kop_attributes[4]), true)
        Refresh()
    else:
        # raise exception
        print "No"

    i+=1

# Create KOP/camera dictionary {KOP:camera id, ..} to associate each
#  KOP with its camera
kop_camera_ids = {}
for camera_id, kop_id in cams_kops.items():
    kop_camera_ids[kop_id.keys()[0]] = camera_id

print kop_camera_ids

SwitchCamera(0) # Activates "Main camera" again

# Now to switch the camera to a known KOP ID's camera, just do:
SwitchCamera(kop_camera_ids[6]) # call camera by the KOP ID
#
#
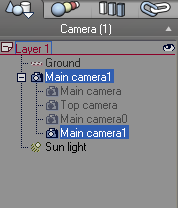
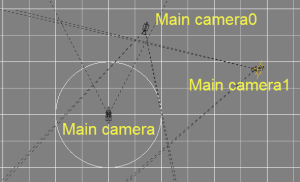
This results in two new cameras, Main camera0 and Main camera1. The names of the cameras in the layer list are pretty much meaningless since you access them via index.

And here is what they look like from the Top view:

[/wptabcontent]
[wptabtitle]Add an array of cylinders[/wptabtitle]
[wptabcontent]
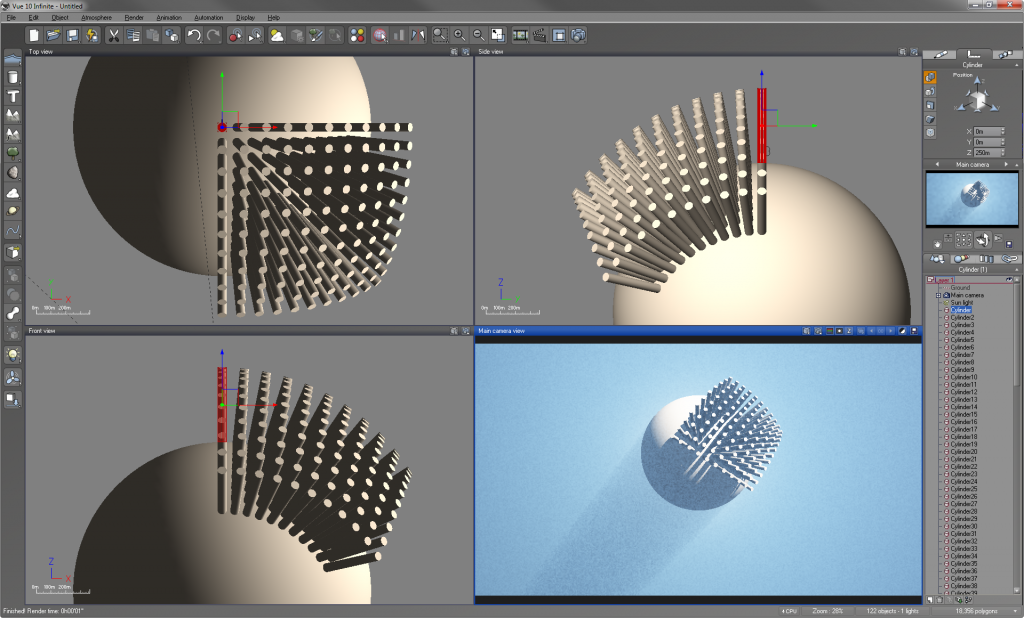
We needed to test and make sure that, when using a planetary sphere in Vue, objects are indeed placed on the curvature of sphere (in our case, the Earth). The following script adds a cartesian-like array of cylinders into a Vue scene. First we need to create the cartesian array of points:
import itertools
d = {}
count = 1
for i in itertools.product([0,100,200,300,400,500,600,700,800,900,1000],
                           [0,-100,-200,-300,-400,-500,-600,-700,-800,-900,-1000]):
    d[count] = list(i)
    count += 1
Which gives us a dictionary of key/value pairs where the key is an id number and the pairs are the X/Y cartesian coordinates, spaced 100 units apart in the X and Y:
for each in d.items()
    print each

(1, [0, 0])
(2, [0, -100])
(3, [0, -200])
(4, [0, -300])
(5, [0, -400])
(6, [0, -500])
(7, [0, -600])
(8, [0, -700])
(9, [0, -800])
(10, [0, -900])
(11, [0, -1000])
(12, [100, 0])
(13, [100, -100])
(14, [100, -200])
(15, [100, -300])
(16, [100, -400])
(17, [100, -500])
(18, [100, -600])
(19, [100, -700])
(20, [100, -800])
(21, [100, -900])
(22, [100, -1000])
...
...
(111, [1000, 0])
(112, [1000, -100])
(113, [1000, -200])
(114, [1000, -300])
(115, [1000, -400])
(116, [1000, -500])
(117, [1000, -600])
(118, [1000, -700])
(119, [1000, -800])
(120, [1000, -900])
(121, [1000, -1000])
Now let’s add z-values to the X and Y lists so we have a height for each cylinder:
d2=d
for k, v in d2.iteritems():
    v.append(500)

for each in d2.items():
    print each

(1, [0, 0, 500])
(2, [0, -100, 500])
(3, [0, -200, 500])
(4, [0, -300, 500])
(5, [0, -400, 500])
(6, [0, -500, 500])
(7, [0, -600, 500])
(8, [0, -700, 500])
(9, [0, -800, 500])
(10, [0, -900, 500])
(11, [0, -1000, 500])
(12, [100, 0, 500])
(13, [100, -100, 500])
(14, [100, -200, 500])
(15, [100, -300, 500])
(16, [100, -400, 500])
(17, [100, -500, 500])
(18, [100, -600, 500])
(19, [100, -700, 500])
(20, [100, -800, 500])
(21, [100, -900, 500])
(22, [100, -1000, 500])
...
...
(111, [1000, 0, 500])
(112, [1000, -100, 500])
(113, [1000, -200, 500])
(114, [1000, -300, 500])
(115, [1000, -400, 500])
(116, [1000, -500, 500])
(117, [1000, -600, 500])
(118, [1000, -700, 500])
(119, [1000, -800, 500])
(120, [1000, -900, 500])
(121, [1000, -1000, 500])
Finally, here is the script to run on a 1km planetary terrain scene within Vue:
d_100s = {1:[0, 0, 500],
          2:[0, -100, 500],
          3:[0, -200, 500],
          4:[0, -300, 500],
          5:[0, -400, 500],
          6:[0, -500, 500],
          7:[0, -600, 500],
          8:[0, -700, 500],
          9:[0, -800, 500],
          10:[0, -900, 500],
          11:[0, -1000, 500],
          12:[100, 0, 500],
          13:[100, -100, 500],
          14:[100, -200, 500],
          15:[100, -300, 500],
          16:[100, -400, 500],
          17:[100, -500, 500],
          18:[100, -600, 500],
          19:[100, -700, 500],
          20:[100, -800, 500],
          21:[100, -900, 500],
          22:[100, -1000, 500],
          23:[200, 0, 500],
          24:[200, -100, 500],
          25:[200, -200, 500],
          26:[200, -300, 500],
          27:[200, -400, 500],
          28:[200, -500, 500],
          29:[200, -600, 500],
          30:[200, -700, 500],
          31:[200, -800, 500],
          32:[200, -900, 500],
          33:[200, -1000, 500],
          34:[300, 0, 500],
          35:[300, -100, 500],
          36:[300, -200, 500],
          37:[300, -300, 500],
          38:[300, -400, 500],
          39:[300, -500, 500],
          40:[300, -600, 500],
          41:[300, -700, 500],
          42:[300, -800, 500],
          43:[300, -900, 500],
          44:[300, -1000, 500],
          45:[400, 0, 500],
          46:[400, -100, 500],
          47:[400, -200, 500],
          48:[400, -300, 500],
          49:[400, -400, 500],
          50:[400, -500, 500],
          51:[400, -600, 500],
          52:[400, -700, 500],
          53:[400, -800, 500],
          54:[400, -900, 500],
          55:[400, -1000, 500],
          56:[500, 0, 500],
          57:[500, -100, 500],
          58:[500, -200, 500],
          59:[500, -300, 500],
          60:[500, -400, 500],
          61:[500, -500, 500],
          62:[500, -600, 500],
          63:[500, -700, 500],
          64:[500, -800, 500],
          65:[500, -900, 500],
          66:[500, -1000, 500],
          67:[600, 0, 500],
          68:[600, -100, 500],
          69:[600, -200, 500],
          70:[600, -300, 500],
          71:[600, -400, 500],
          72:[600, -500, 500],
          73:[600, -600, 500],
          74:[600, -700, 500],
          75:[600, -800, 500],
          76:[600, -900, 500],
          77:[600, -1000, 500],
          78:[700, 0, 500],
          79:[700, -100, 500],
          80:[700, -200, 500],
          81:[700, -300, 500],
          82:[700, -400, 500],
          83:[700, -500, 500],
          84:[700, -600, 500],
          85:[700, -700, 500],
          86:[700, -800, 500],
          87:[700, -900, 500],
          88:[700, -1000, 500],
          89:[800, 0, 500],
          90:[800, -100, 500],
          91:[800, -200, 500],
          92:[800, -300, 500],
          93:[800, -400, 500],
          94:[800, -500, 500],
          95:[800, -600, 500],
          96:[800, -700, 500],
          97:[800, -800, 500],
          98:[800, -900, 500],
          99:[800, -1000, 500],
          100:[900, 0, 500],
          101:[900, -100, 500],
          102:[900, -200, 500],
          103:[900, -300, 500],
          104:[900, -400, 500],
          105:[900, -500, 500],
          106:[900, -600, 500],
          107:[900, -700, 500],
          108:[900, -800, 500],
          109:[900, -900, 500],
          110:[900, -1000, 500],
          111:[1000, 0, 500],
          112:[1000, -100, 500],
          113:[1000, -200, 500],
          114:[1000, -300, 500],
          115:[1000, -400, 500],
          116:[1000, -500, 500],
          117:[1000, -600, 500],
          118:[1000, -700, 500],
          119:[1000, -800, 500],
          120:[1000, -900, 500],
          121:[1000, -1000, 500]}

def get_object_size(vue_object):
    """ Takes a input Vue object, gets it's bounding box, then does the
        math to get the XYZ size of the object. Returns a X,Y,Z tuple of
        the object size.
    """
    bounding_box = vue_object.GetBoundingBox()
    bb_min = bounding_box.GetMin()
    bb_max = bounding_box.GetMax()
    # Build our tuple of object XYZ size
    object_size = (bb_max[0] - bb_min[0], bb_max[1] - bb_min[1],
                   bb_max[2] - bb_min[2])
    return object_size

i = 1
for k, v in d_100s.iteritems():
    AddCylinder()
    cyl = GetSelectedObjectByIndex(0)
    cyl.SetPosition((v[0]), (v[1]), v[2]/2)
    Refresh()
    # Get Z size of object
    orig_z = get_object_size(cyl)[2]
    print orig_z
    cyl.ResizeAxis(10, 10, (v[2])/orig_z)
    Refresh()
    DeselectAll()
    i += 1
And the end result is this:

Now, granted this isn’t the most practical script, but it does show how a little bit of work with itertools, dictionaries, and the Vue API lets you place a massive amount of objects into a scene relatively painlessly and quickly.
[/wptabcontent]
[/wptabs]
