This page will show you how to process raw scan data from the Optech ILRIS in ILRIS Parser and how to view and ‘clean’ the data in Polyworks PIFEdit.
Hint: You can click on any image to see a larger version.
[wptabs style=”wpui-alma” mode=”vertical”] [wptabtitle] THE OPTECH PARSER[/wptabtitle]
[wptabcontent]
Introducing the Optech ILRIS-3D Parser:
The Parser program processes raw scanner data in a variety of output formats recognized by PolyWorks, GIS softwares, and other 3D modeling suites.
Using ILRIS Parser
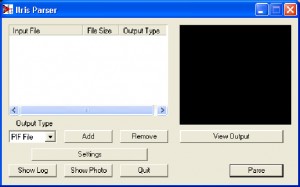
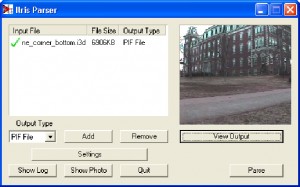
Open the Parser program by double-clicking on the icon on your desktop. The Parser window displays as follows:
[/wptabcontent]
[wptabtitle] ADD DATA[/wptabtitle] [wptabcontent]
Add your data
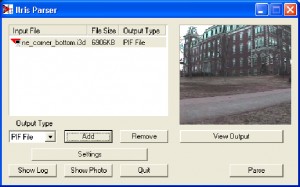
Add your .i3d file by clicking the “Add” button.
Browse to the scan file location and select the desired scan.
The .i3d file is added to the file window in the Parser. A photograph of the scanned area acquired by the laser scanner is also viewable in the Parser window.
[/wptabcontent]
[wptabtitle] OUTPUT FILES & GENERAL SETTINGS [/wptabtitle] [wptabcontent]
Next, specify your desired output file type. For more information on output file types and their respective settings, please refer to the ILRIS-3D Operation Manual (Section 9). The PIF file type is the default output file type and is a PolyWorks specific format for use in the Polyworks Suite. The PIF output options are discussed in the following slides.
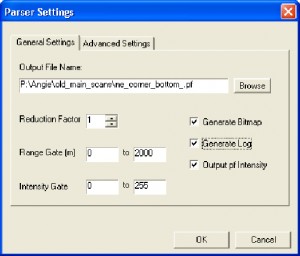
Click on the “Settings” button.
In the Output File Name textbox, specify the name and location for the output PIF file.
The Reduction option allows you to subsample your data (recommended subsampling: 1).
Filtering – You also have the option to “filter” your data by specifying a Range Gate and/or an Intensity gate.
The Range Gate option specifies a desired data range based on distance from the scanner (in meters)
The Intensity Gate option specifies a desired data range based on the intensity readings returned from the scanner. While it is good practice to range grade your data to remove outliers etc…, it is not required because the data can also edited in the PIFEdit software.
[/wptabcontent]
[wptabtitle] MORE GENERAL & ADVANCED SETTINGS [/wptabtitle] [wptabcontent]
General Settings:
It is recommended to leave the Generate Bitmap, Generate Log, and Output pf Intensity options checked.
Generate Bitmap creates a separate .bmp file of the scan photograph
Generate Log creates a report containing the scan statistics
Output pf Intensity adds the intensity values returned from the scanner to the PIF file.
General Details and Advanced Settings:
For more on these options and those available in the Advanced Settings tab, please refer to the ILRIS-3D Operation Manual (Section 9).
[/wptabcontent]
[wptabtitle] PARSE DATA [/wptabtitle] [wptabcontent]
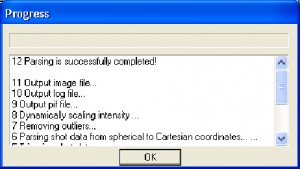
When the desired options have been selected in the “Settings” menus, click “Ok,” and “Parse” the data. A progress report is displayed to show the steps and completion of the parsing process
[/wptabcontent]
[wptabtitle] CONFIRM PARSING IS SUCCESSFUL[/wptabtitle] [wptabcontent]
Note that a green check appears beside the file name in the file window indicating that that the file has been parsed.
To view the resulting PIF file, click the “View output” button.
[/wptabcontent]
[wptabtitle] VIEW PARSED DATA [/wptabtitle] [wptabcontent]
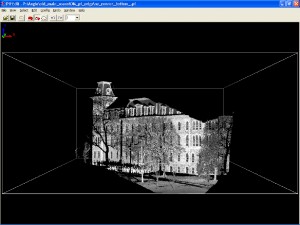
Once you click ‘View Output’ in ILRIS Parser, the PIF file is opened in the PIFEdit viewing window
[/wptabcontent]
[wptabtitle] FILES CREATED IN PARSING [/wptabtitle] [wptabcontent]
Note that a PIF file (.pf), a report log (.txt) and a bitmap of the scan photo (.bmp) are created in the parsing process.
[/wptabcontent]
[wptabtitle] CONTINUE TO…[/wptabtitle]
[wptabcontent] Continue to Polyworks PIFEdit: Cleaning Point Cloud Data[/wptabcontent]
[/wptabs]
