[wptabs style=”wpui-alma” mode=”vertical”] [wptabtitle] CYCLONE PREFERENCES: POINT CLOUD
[/wptabtitle]
[wptabcontent]
Importing Data into Cyclone:
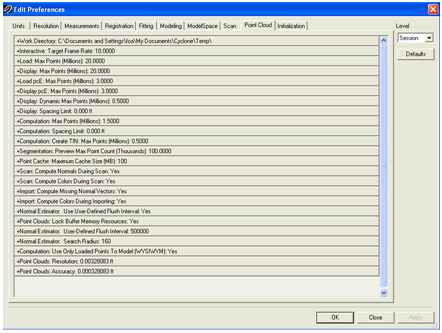
Before importing data (especially data that is imported from onboard collection), it is important to set Cyclone’s preferences to ensure normals and color are imported simultaneously with data. First Go to Edit/Preferences/Point Cloud Tab. After Cyclone 7.1.1, some of these preferences are the default setting. Change the level from “Session” to “Default”. Then check the following preference settings:
a) Work Directory – This is the location from which the computing power/memory space will be taken. It is recommended that you direct this working directory to the largest drive with the most free space possible on your computer
b) Load: Max Points (Millions) – This determines how many points are loaded upon opening a ModelSpace. The larger the number, the more data that is loaded which greatly increases the required computing power and rendering time. It is recommended to leave this at default settings until you determine the needs in your data and the capabilities of your computer.
c) Display: Max Points (Millions) – This determines how many points are displayed upon opening a ModelSpace. The larger the number, the more data that is displayed. Again, this greatly increases the required computing power and rendering time. It is recommended to leave this at default settings until you determine the needs in your data and the capabilities of your computer.
d) Scan: Compute Normals During Scan: Yes
e) Scan: Compute Colors During Scans: Yes
f) Import: Compute Missing Normal Vecotrs: Yes
g) Import: Compute Colors During Importing: Yes
h) Display: Treat (0,0,0) Colors as Missing: No
e) All normals setting should be set to Yes
NOTE: If these preferences were NOT set before import, data that has been collected onboard must have multi-image applied after import. These preferences slow the import but it is less demanding on the user and comparable in time to applying the multi-image command later.[/wptabcontent]
[wptabtitle] IMPORT MORE SCANS[/wptabtitle] [wptabcontent]
- Add scans to your project by using the import command (either File, Import C10 Data or RC’ing the project, Import C10 data). It is important to import C10 data specifically (versus generic ‘Import Data) to ensure all data imports correctly.
- Select the Project Level Folder of your project (immediately within the default Scanner-Projects folder). If you receive the warning ‘Invalid Folder Selection’, confirm that you are selecting the project level (this folder contains Station_### folders, a ControlPoints.ini, and a project.ini).
- Select Import. If preferences were not set in Step 1 and you are prompted, DO estimate normals and DO NOT subsample the data (unless file sizes become an issue).
- All of the imported scans will be listed as ScanWorlds in Navigator. They can be viewed by RCing and selecting Open TruSpace (view is a panoramic view and is constrained to scanner position) or by expanding down the menu and opening the ModelSpace (not constrained to scanner position). NOTE: If message specifically lists scan(s) and states “Unable to import: Scan #” this usually means that the scan itself is corrupted. Move the scan to a different folder and re-try the import. Sometimes the erroneous scan can be fixed (for example, when 2 scans have been collected within the same station, manually remove one scan and re-attempt importing)
- It is recommended that you inspect all scan worlds and targets in detail immediately after import.
[/wptabcontent]
[wptabtitle] CONTINUE TO…[/wptabtitle]
[wptabcontent] Continue to Cyclone 7.1.1: Registering Scans in Cyclone[/wptabcontent]
[/wptabs]
