[wptabs style=”wpui-alma” mode=”vertical”]
[wptabtitle] PRE-REGISTRATION DATA CLEANUP[/wptabtitle]
[wptabcontent]
Pre-Registration Data Cleanup in Cyclone:
If you would like to edit the data (clean up or remove bad or unuseful data) prior to a registration, follow the steps below.
- To clean noise or unwanted points from unprocessed/imported point cloud -> Create/Open ModelSpace (MS) -> > Use selection and fencing tools to finish cleaning/deleting cloud -> Select cleaned point cloud -> Tools -> Registration -> Copy to Control Space -> Close MS
- Open Control Space -> Select all should show 2 point clouds -> Select original cloud (selecting single point that was deleted/cleaned in MS will select the original point cloud) -> delete the original point cloud so that only the edited/cleaned point cloud remains -> Select all (should be a single edited cloud) -> Tools -> Scanner -> Set scan world default clouds -> Close
[/wptabcontent]
[wptabtitle] CLOUD CONTRAINTS WIZARD[/wptabtitle]
[wptabcontent]
Registering Scans in Cyclone:
“Registration is the process of integrating the ScanWorlds for a project into a single coordinate system as a registered ScanWorld. This integration is derived by using a system of constraints, which are pairs of equivalent or overlapping objects that exist in two ScanWorlds. The objects involved in these constraints are maintained in a ControlSpace, where they can be reviewed, organized, and removed. They cannot be moved or resized in the ControlSpace.
The registration process computes the optimal overall alignment transformations for each component ScanWorld in the registration, such that the constraints are matched as closely as possible.”
- To register scans together in cyclone, go to Create – Registration. Open the Registration
- From the Registration window, RC and add all of the ScanWorlds that you want to register.
- Open the Cloud Constraints Wizard and choose 2 ScanWorlds that you want to add constraints to and click update.
* Tip: To remove a picked point, simply select on the point again.[/wptabcontent]
[wptabtitle] PICK MATCHING POINTS[/wptabtitle]
[wptabcontent]
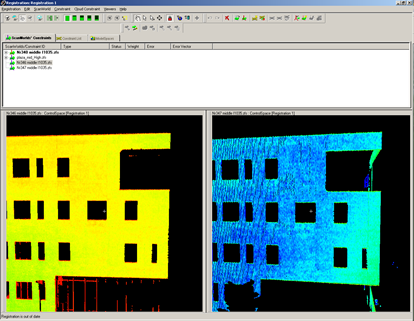
 Figure 1: Locking two scan views so that the views rotate/pan/etc… together
- Next Pick at least 3 matching points between the 2 viewers. It is CRITICAL to use the Multi-pick button
 (single pick will erase all other previously picked points in that ScanWorld) and to also ZOOM IN CLOSE when picking points. Also pick points that are spread out across the scan and across different geometries/planar directions. Once the two scan views are aligned to one another, you can also use the Lock button
  to constrain the two views so that they move/rotate together. Once you have selected all of your points, select Constrain from the Cloud Constraints wizard or by going to the Constraint – Add Cloud Constraint. If the Constraint does not work, pick more points and/or remove any bad or incorrect points.NOTE: Cyclone only uses 3 pick points; if you pick 4 or more cyclone will only use the best 3.
[/wptabcontent]
[wptabtitle] OPTIMIZE CONSTRAINT[/wptabtitle]
[wptabcontent]
Once the constraint is successfully added, got to the Constraints tab, select the constraint then go to the Cloud Constraint menu and select Optimize Constraint. A histogram appears showing each of the iterations being run – a very steep curve on the left hand side of the histogram is ideal. If the Optimize results come back as under constrained, the results may still be useable in registration. Always observe the Error Vector/RMS error from the constraint optimization, it should always be around .01m – if it is not – pick more accurate points and Update the constraint.
NOTE: Choosing points or using targets to place constraints aligns two individual ScanWorlds. Global Registration uses all of the constraints/ScanWorlds to spread the error among constraints throughout the project; In the registration, the Constraint List tab has several options (continue to next tab for an explanation of these options.[/wptabcontent]
[wptabtitle] CONTRAINT LIST OPTIONS[/wptabtitle]
[wptabcontent]
- Weight on constraints are created such that their error contribution to the global registration is scaled relative to the error contribution of HDS Target constraints with weights of 1.0; the value can be set from 0.0 (constraint has no effect on registration) to 1.0; a constraint set to 0.5 has half the influence of a constraint set to 1.0. Decreasing weight of a constraints with higher than average error is not recommended as it leads to lower overall accuracy. You should decrease weight only if you believe the measurement of one or both of the objects in the constraint are less accurate than the other constraints.
- The Error column lists the error of each constraint after global registration; this is the distance between the two constraint objects after optimal registration for their ScanWorlds; Important: this number relates the individual constraint error to the home ScanWorld and becomes relevant only when all ScanWorlds are registered – therefore this value can be ignored (and may increase/vary greatly) during alignment and should be reviewed only after registration.
- Error Vector or Root Mean Square (RMS) error represents the error for the individual constraint between two ScanWorlds. This error is directly related to the accuracy and density of the data (a general rule of thumb is that accuracy should be a 10% or better of point spacing).
[/wptabcontent]
[wptabtitle] CONTRAINT LIST OPTIONS PT 2[/wptabtitle]
[wptabcontent]
- Max Search Distance is how far cyclone looks to find overlapping data – this was also used in initial pick points, meaning if your initial pick points were larger than this number the initial constraint would have failed.
- Subsampling Percentage is the amount of data used in the optimization operation; by default this is set to 3% (which is fine when the data has plenty of overlap or when using slow laptop in the field); however, when improving the RMS and tightening up a constraint, increasing this percentage (between 20-80% depending on size of data set) is very useful
- Max Iterations is the number of times the optimization algorithm repeats; by default this is set to 100; increasing this value to 500 when increasing the subsampled set has shown to improve the RMS, however, any advantage to increasing it beyond 500 is questionable.
- Optimization Preferences – After running an optimization, if the RMS is still higher than desired, adjusting the parameters of the optimization operation may help improve the alignment > Select the constraint in the constrain list > RC > Cloud Constraint > Edit Parameters >
[/wptabcontent]
[wptabtitle] VIEW YOUR RESULTS[/wptabtitle]
[wptabcontent]
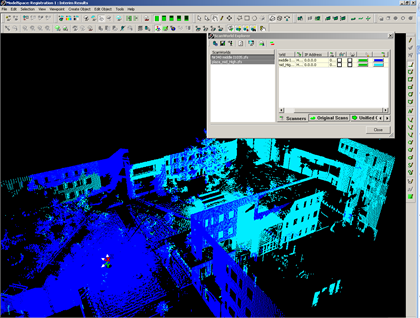
To view the results of the registration between 2 scans, RC on the Constraint in the Constraints List and choose View Interim Results – this will open a model space with the two aligned scans. Check building/window edges and other identifiable features in both scans and make sure that they line up correctly. Go to Tools – Scanner – ScanWorld Explorer – Shift + select both scans and choose the last icon which applies a unique color to each ScanWorld which also helps in visualizing the quality of the alignment (see image below). If you are happy with the results, close the ModelSpace view and do not save.
 Figure 2: Using the ScanWorld Explorer in a ModelSpace View to assign each scan a unique color
[/wptabcontent]
[wptabtitle] CONTINUE REGISTERING SCANS[/wptabtitle]
[wptabcontent]
- Next, repeat steps 3-6 for the next scan in the sequence. The logic is to align Scan A to Scan B, Scan B to Scan C, and on around until you align Scan Z back to Scan A
- Once all constraints have been added, verified and optimized, you are ready to run the registration process. Go to the Registration Menu and choose Register. Once the Registration is complete, the Registration Diagnostics will be displayed indicating the success of the registration. Note the error statistics and SAVE THIS FILE in your root data directory.
- Now you are ready to create a new ScanWorld that consists of the registered scans. Go to the Registration Menu and choose Create ScanWorld/Freeze Registration.
- Return to the Cyclone Navigator and a newly created ScanWorld [Registration1] file will be created at the bottom of the scan list in your project. Create a new ModelSpace View from the registered ScanWorld.
- If you would like to continue modeling in the new created ModelSpace View or to further optimized the registered point cloud, you should consider unifying or merging the datset (see information on Unify/Merge below)
[/wptabcontent]
[wptabtitle] UNIFYING OR MERGING MULTIPLE REGISTERED POINT CLOUDS[/wptabtitle]
[wptabcontent]
Unifying or Merging Multiple Registered Point Clouds in Cyclone:
Unifying Point Clouds combines multiple point clouds into a single efficient point cloud within a single ModelSpace. The Unify Command is usually executed within a ModelSpace containing multiple, registered scans with a large number of point clouds; after clouds are unified, you generally want to Set ScanWorld Default Clouds to designate the unified cloud as the default cloud for all subsequent ModelSpaces. Note that Unifying cannot be undone and the ScanWorld Explorer is no longer available so it is highly suggested to copy the original data before unifying. Unifying a dataset also removes redundant overlapping points.
Merging combines two or more objects of the same type to create a single new object. The merge function fills in the space between the selected objects and is particularly useful to fill in areas that have not been scanned directly. If created from point clouds, merged objects are refit to the original clouds depending on the current settings for Object Preferences and fit. Users can access the ScanWorld Explorer after merging.
To Unify Multiple Registered Point Clouds > Select All > Tools > Unify Clouds > Options:
-
Reduce Cloud: Average Point Spacing (optional)
- Enter a value for that average desired spacing between any two points. This will subsample the data to the entered resolution
-
Point Cloud Reduction (optional)
- Additional data reduction. If you are dealing with a very complex, large dataset – some data reduction is recommended.
To Merge Multiple Registered Clouds > Select All > Create Object > Merge[/wptabcontent][/wptabs]